Sitecore 9.x Security Hardening
Whenever we have a website that has accessibility to everyone, maintaining security will be an important factor in order to avoid security breaches and data thefts. Web security is at the front of every business person’s mind. So Sitecore has recommended several key points for making your platform more secure, below are few security tasks that would be good practice to follow that,
- Login security
- Deny anonymous users access to key folders
- Disable client RSS feeds
- Secure the file upload functionality
- Disable SQL Server access from XSLT
- Secure Telerik controls
- Limit access to certain file types
- Protect Phantom JS
- Protect media requests
- Remove header information from responses sent by your website
Login security
We must use the strong password policy recommended by MSDN in order to avoid hacking the password by hackers. Change Hash algorithm for password encryption. Open web. Config file and in the <membership> node, set the hash algorithm Type to SHA512.
We must change the administrator password to a strong password. Changing the password prevents unauthorized users from using the default password to access the admin account. If possible disable and create named Administrator accounts.
Turn of remember me for login page. On the Sitecore Identity Server role, open sitecore/Sitecore.Plugin.IdentityServer/Config/identityServer.xml file and set the Allow Remember Login setting to false. This also ignores any existing Remember me cookies, and all users have to log in again.
Deny anonymous users access to key folders
It is important to disable the Anonymous Authentication under IIS Settings for the following folders within the Sitecore Website.
- /App_Config
- /Sitecore/admin
- /sitecore/debug
- /sitecore/login
Below is an example way to disable it,
- Get in Sitecore Instance and expand the Sitecore website

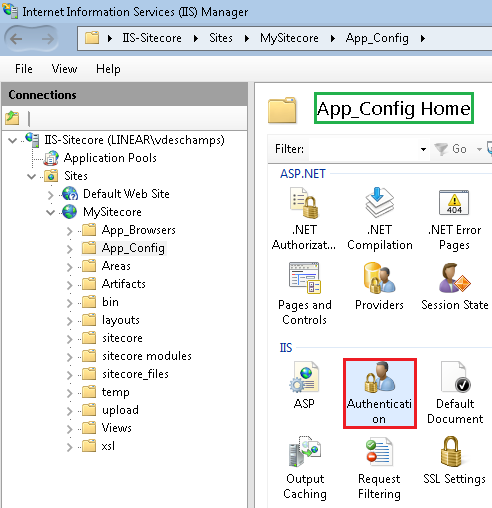
- Select App Config and select it. Once App Config is selected, look to your right and select the Authentication icon to double click on it.

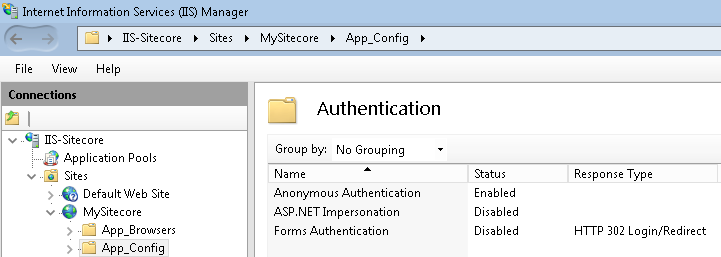
- In the Authentication folder, you will see the list of all authentication methods available on your Web Server.

- Click on the Anonymous Authentication, disable it by selecting it on the Actions panel at your right.

- Restart IIS
Disable client RSS feeds
In case of our Sitecore installation contains sensitive information that you want to protect, you should disable the Sitecore client RSS feeds. If an unauthorized user gains access to the URL of a client RSS feed, they can follow the link and view all the content contained in the client feed even though their own security permissions do not give them access to this item. The users who are subscribed to Sitecore client RSS feeds have direct access to the item given as RSS feed to them and they will not have to identify themselves to the Sitecore security system when they view the feed.
To disable the Sitecore client RSS feed:
- Open the web.config file.
- Locate the <httpHandlers> section. Depending on your IIS pool, this section may be called <Handlers>.
- Remove the following handler:
<add verb=”*” path=”sitecore_feed.ashx” type=”Sitecore.Shell.Feeds.FeedRequestHandler, Sitecore.Kernel”/>
Secure the file upload functionality
- If we are allowing users to modify the content of the upload folder, we also give them the permissions to place scripts and executable programs in the folder. Executing these scripts and programs can cause unexpected behavior on the server.
- In order to avoid this, we can deny permissions to run scripts and executable files in the upload folder to prevent an uploaded file from being executed when a user attempts to download it.
Below are the steps to deny both Script and Execute permissions for the upload folder,
-
- Open the Internet Information Services (IIS) Manager.
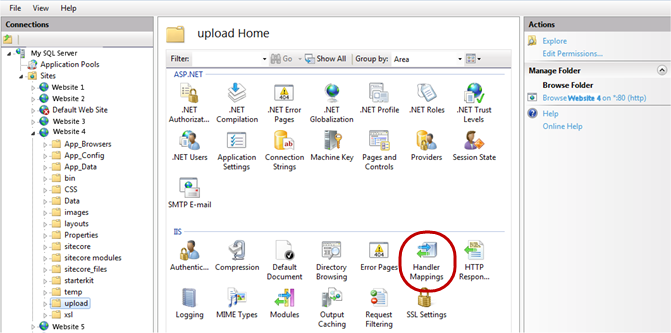
- Navigate to and click the upload folder for the relevant website, and then under the IIS section, double-click Handler Mappings.

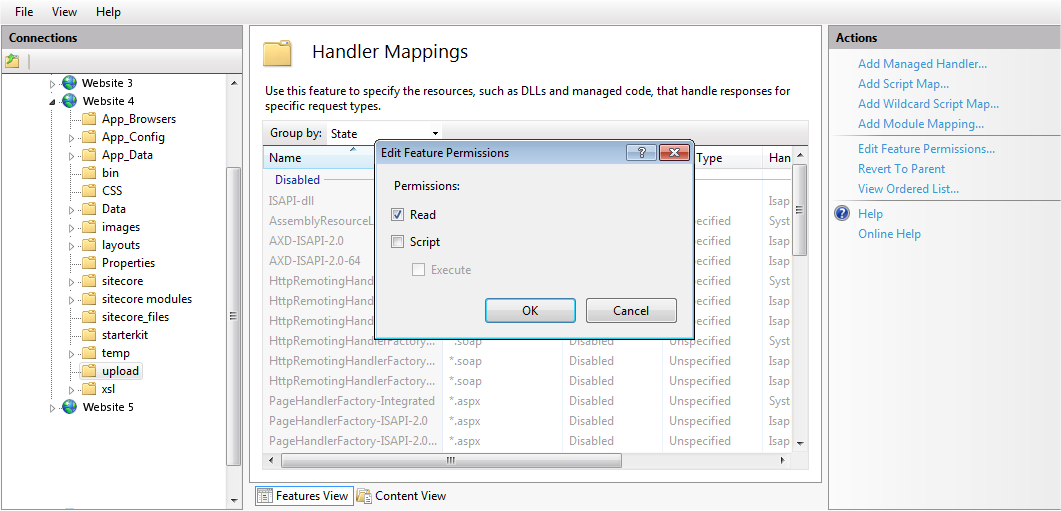
- In the Actions pane, click Edit Feature Permissions.
- In the Edit Feature Permissions dialog box, clear the Script and Execute checkboxes and click OK.

Disable SQL Server access from XSLT
Sitecore includes an xslExtension helper for use with SQL Server. You can disable it either when we are not using it or not using Sitecore XSLT renderings.
To disable the xslExtension helper:
- In the App_Config/Include folder, create a patch file. Give it a file name that ends with the extension .config.
- Insert the following code in the patch file:
<configuration xmlns:patch=”http://www.sitecore.net/xmlconfig/”>
<sitecore>
<!– disable XSLT security issue see https://doc.sitecore.net/sitecore_experience_platform/setting_up_and_maintaining/security_hardening/configuring/disable_sql_server_access_from_xslt –>
<xslExtensions>
<extension type=”Sitecore.Xml.Xsl.SqlHelper, Sitecore.Kernel”>
<patch:delete/>
</extension>
</xslExtensions>
</sitecore>
</configuration>
Secure Telerik controls
Sitecore uses some UI controls from Telerik. These controls are only used in a Content Management environment.
- In all non-Content Management environments, in the web.config file, remove the following nodes:
<add name=”Telerik_Web_UI_DialogHandler_aspx” verb=”*” preCondition=”integratedMode” path=”Telerik.Web.UI.DialogHandler.aspx” type=”Telerik.Web.UI.DialogHandler” />
<add name=”Telerik_Web_UI_SpellCheckHandler_axd” verb=”*” preCondition=”integratedMode” path=”Telerik.Web.UI.SpellCheckHandler.axd” type=”Telerik.Web.UI.SpellCheckHandler” />
<add name=”Telerik_Web_UI_WebResource_axd” verb=”*” preCondition=”integratedMode” path=”Telerik.Web.UI.WebResource.axd” type=”Telerik.Web.UI.WebResource” />
- In a Content Management environment, you must configure the encryption key that is used to secure the Telerik upload control.
In the web.config file, in the appSettings section, create a node for the Telerik configuration encryption keys:
<appSettings>
<add key=”Telerik.AsyncUpload.ConfigurationEncryptionKey” value=”YOUR_ENCRYPTION_KEY_HERE” />
<add key=”Telerik.Upload.ConfigurationHashKey” value=”YOUR_ENCRYPTION_KEY_HERE” />
<add key=”Telerik.Web.UI.DialogParametersEncryptionKey” value=”YOUR_ENCRYPTION_KEY_HERE” />
</appSettings>
Limit access to certain file types
Sitecore recommends to improve the security of your Sitecore installation, edit the web.config file, and disable the web.config file with EXM settings.
- To limit access to XML, XSLT, and MRT files:
- Open web.config file in the Website folder.
- In the <system.webServer><handlers> section, add the following lines:
<system.webServer>
<handlers>
<add path=”*.xml” verb=”*” type=”System.Web.HttpForbiddenHandler” name=”xml (integrated)” preCondition=”integratedMode”/>
<add path=”*.xslt” verb=”*” type=”System.Web.HttpForbiddenHandler” name=”xslt (integrated)” preCondition=”integratedMode”/>
<add path=”*.config.xml” verb=”*” type=”System.Web.HttpForbiddenHandler” name=”config.xml (integrated)” preCondition=”integratedMode”/>
<add path=”*.mrt” verb=”*” type=”System.Web.HttpForbiddenHandler” name=”mrt (integrated)” preCondition=”integratedMode”/>
This restricts access to all XML, XSLT, and MRT files.
- Disable the web.config file that has EXM settings. This is in the \sitecore modules\Shell\EmailCampaign\ folder.
Protect PhantomJS
PhantomJS is a third-party program is used to generate screenshots of web pages on the Sitecore CMS and EXM. We can improve the security around PhantomJS by limiting its permissions, and disabling it on roles where it is not needed.
- Move the <webroot>\App_Data\tools\phantomjs\ folder to, for example, C:\phantomjs\.
- Create a patch file named, for example, MovePhantomJSFolder.config in <webroot>\App_Config\Include\ folder,
- Insert the following configuration:
Copy<configuration xmlns:patch=”http://www.sitecore.net/xmlconfig/” xmlns:role=”http://www.sitecore.net/xmlconfig/role/” xmlns:security=”http://www.sitecore.net/xmlconfig/security/”>
<sitecore>
<setting name=”ContentTesting.PhantomJS.ExecutablePath” value=”C:\phantomjs\phantomjs.exe” />
</sitecore>
</configuration>
- Save the patch file.
Protect media requests
The media request protection feature is used to restrict the media URLs that contain dynamic image-scaling parameters. This ensures that the server only spends resources and disk space on valid image-scaling requests.
You can make your solution even more secure and use the Sitecore media request protection feature optimally if you patch the Sitecore.Media.RequestProtection.config file.
To optimize the media request protection feature:
- Create a patch file MediaRequestProtectionCustom.config in In the App_Config\Include\ folder.
- Insert the following code:
<configuration xmlns:patch=”http://www.sitecore.net/xmlconfig/”>
<sitecore>
<settings>
<setting name=”Media.RequestProtection.SharedSecret” value=”YourRandomGeneratedString”/>
</settings>
</sitecore>
</configuration>
- Save the patch file.
Remove header information from responses sent by your website
By removing the X-Aspnet-Version HTTP header information from each web page, it will save a little bandwidth and also ensures that we are not broadcasting which version of ASP.NET using. To remove the X-Aspnet-Version HTTP header from each response from ASP.NET, add the following code to the web.config file.
<system.web>
<httpRuntime enableVersionHeader=”false” />
</system.web>
By removing the X-Powered-By HTTP header, we are not broadcasting which version of ASP.NET using. To remove the X-Powered-By HTTP header from each response from ASP.NET, add the following code to the web.config file:
<system.webServer>
<httpProtocol>
<customHeaders>
<remove name=”X-Powered-By” />
</customHeaders>
</httpProtocol>
</system.webServer>
Sitecore 9.x Security Hardening | Sitecore CMS Development Company in USA India
Author: Prabhu Ranganathan, Sitecore Specialist

