Upgrade to Sitecore 9 Update 2 Installation (Sitecore XP 9.0.2)
Sitecore 9 Update 2 Setup Prerequisites
- Windows 10 / Windows 8.1
- Windows PowerShell Version 5.1 or later
- MS SQL 2016 SP1 or later
- MS SQL Management Studio
- .NET 4.6.2 or later
- Web Deploy 3.6
- URL Rewrite 2.1
- Solr 6.6.2
- Java Runtime Environment
- NSSM (Download nssm 2.24)
- Sitecore License must have xDB enabled
- Packages for XP Single (On-Premises Deployment)
Note: Please verify all version before it gets started to setup
- Install Windows 10/Windows 8.1
- Install Web Deploy 3.6
- Install Java Runtime Environment and Set JAVA_HOME.
3.1. To setup JAVA_HOME, please follow below instruction after installing JRE/JDK
3.1.1. Locate your JAVA Installation directory C:\Program Files\Java\jre1.8.0_181
3.1.2. Search for “Advanced System Settings” in Windows 10/8.1, Click on “View Advanced System Settings”
3.1.3. Click the “Environment Variable” button in Advanced tab
3.1.4. Under System variables section, Click “New”
3.1.5. In the Variable Name field, enter either,
JAVA_HOME if you installed the JDK (Java Development Kit)
Or
JRE_HOME if you installed the JRE (Java Runtime Environment)
3.1.6. In the Variable value, enter your JDK or JRE path
3.1.7. Click “OK”
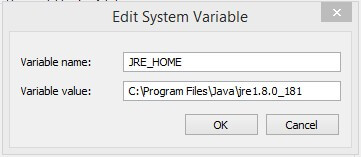
3.1.8. Open Command prompt in admin mode and verify JAVA_HOME using echo %JAVA_HOME%
Note: If you already set it up JAVA_HOME, skip this step
- Install MS SQL Server and MS SQL Management Studio if not installed yet
- Install .NET Framework if not installed yet
- Create new folder D:\sc9_Update2_Install
- Install and setup Solr 6.6.2
7.1. Click here to download Solr 6.6.2
7.2. Copy, paste and unzip Solr 6.6.2 folder in D:\sc9_Update2_Install
7.3. Open command prompt in Administrator mode
7.4. Start solr
7.4.1. Setup path to D:\sc9_install\solr-6.6.2\bin
7.4.2. Run “solr start” command, refer screenshot

7.4.3. The default port for solr is 8983. You can change port by using Solr start -p 8984 (Now your solr instance will run on 8984). refer Screenshot

7.4.4. Open a browser and navigate to http://localhost:8984
Note: A another solr version running in 8983 port, so we are changed to 8984 for solr, or else you can run your solr in default port as 8983
- Make Solr 6.6.2 run as Windows Service
8.1. Download and install NSSM (Download nssm 2.24)
8.2. Copy, paste and unzip nssm-2.24 in D:\sc9_Update2_Install
8.3. Open Command prompt in admin mode and run the following command
8.3.1. Setup path to D:\sc9_install\solr-6.6.2\bin
8.3.2. Run “nssm install Solr_6.6.2_Update2” command and hit enter
8.3.3. You can see “NSSM Service Installer” popup,
Set “Path” to D:\sc9_Update2_Install\solr-6.6.2\bin\solr.cmd
Set “Startup directory” to D:\sc9_Update2_Install\solr-6.6.2\bin
Set “Arguments” to start -f -p 8984
Click on “Install Service” button, Now Solr service is installed
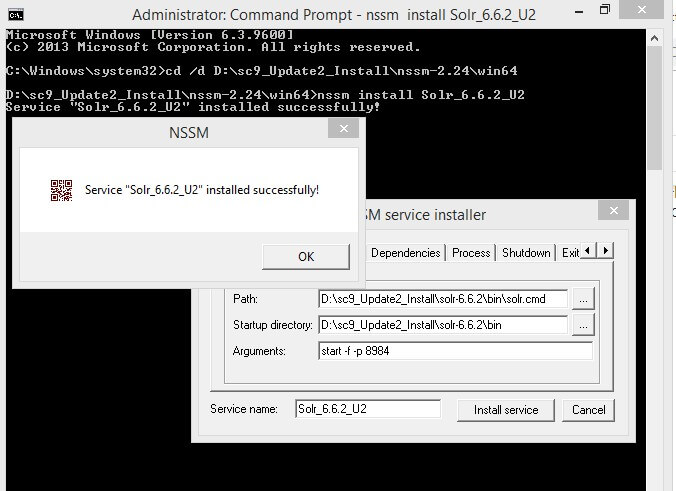 Restart solr service Solr_6.6.2_U2
- Setup SSL for Solr_6.6.2_U2
9.1. Download solrssl.ps1 and paste it in D:\sc9_Update2_Install
9.2. Open Windows PowerShell in administrator mode
9.3. Run solrrssl.ps1, refer below screenshot

9.4. It will ask keytool file, get keytool from installed JRE bin folder (C:\Program Files\Java\jre1.8.0_181\bin\keytool.exe) and hit enter
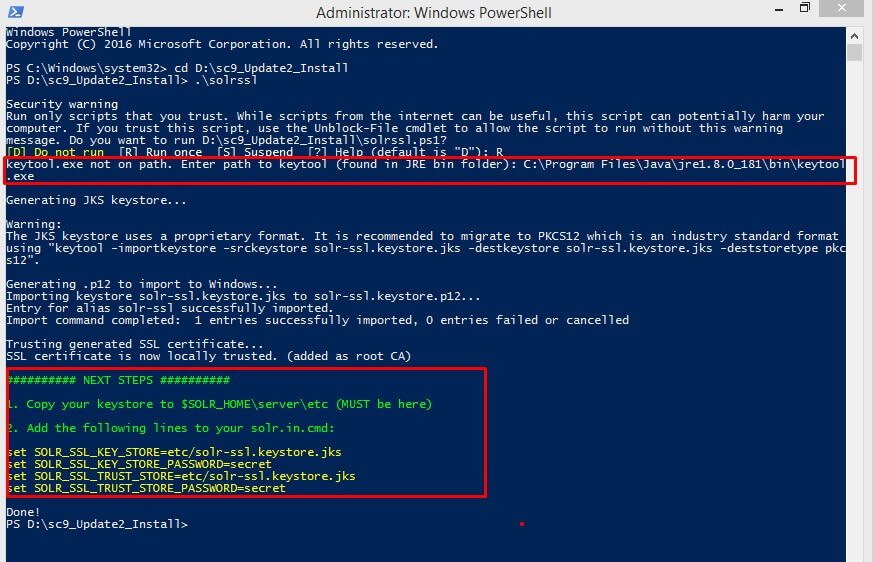
Note: If you get the error on running this script, please run following command Set-ExecutionPolicy -Scope CurrentUser Unrestricted
9.5. Now open the folder D:\sc9_Update2_Install, you can get two files
a) solr-ssl.keystore.jks b) solr-ssl.keystore
Copy both and paste it in D:\sc9_Update2_Install\solr-6.6.2\server\etc
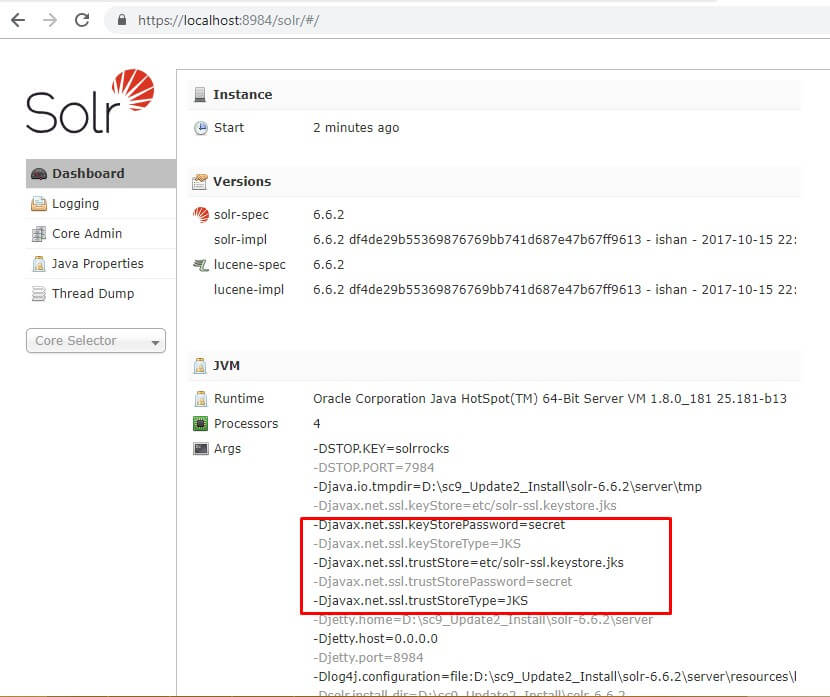
Open solr.in which in D:\sc9_Update2_Install\solr-6.6.2\bin and uncomment following lines and save.
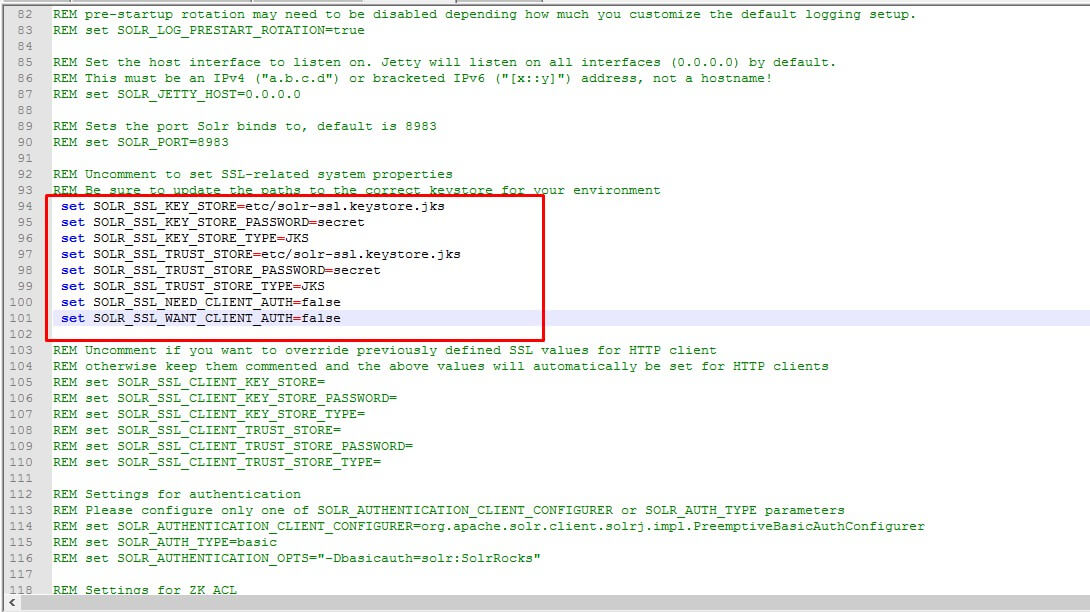
9.6. Open a browser and navigate to https://localhost:8984
Note: If Solr instance is not loaded at https, please restart Solr_6.6.2_U2 and try again
- Install Sitecore Install Framework
10.1. Open Windows PowerShell in administrator mode
10.2. Run following commands one after another
- a) Register-PSRepository -Name SitecoreGallery -SourceLocation https://sitecore.myget.org/F/sc-powershell/api/v2
- b) Install-Module SitecoreInstallFramework
- c) Update-Module SitecoreInstallFramework
- Enable Database Authentication
Execute following SQL query in SSMS and run in administrator mode.
sp_configure ‘contained database authentication’, 1;
GO
RECONFIGURE;
GO
You can download here
- Download Packages for XP Single (On-Premises Deployment) (Note: User must login into https://dev.sitecore.net/ before downloading)
12.1. Copy and paste “Sitecore 9.0.2 rev. 180604 (OnPrem)_single.scwdp” zip into D:\sc9_Update2_Install and unzip it
12.2. Now you can get three zip files, unzip “XP0 Configuration files 9.0.2 rev. 180604”, copy and paste all files to D:\sc9_Update2_Install

12.3. Open raw and copy/paste sitecore-xp0.json into D:\sc9_Update2_Install\sitecore-xp0.json (replace)
12.4. Open raw and copy/paste xconnect-xp0.json into D:\sc9_Update2_Install\xconnect-xp0.json (replace)
12.5. Copy and paste Sitecore license file (license.xml) to D:\sc9_Update2_Install
12.6. Download installation script sc9_install_customDir.ps1 and change the following parameters.
1.$prefix
2.$InstallDirectory (Note: this one is to specify your own install directory)
3.$SqlServer
4.$SqlAdminUser
5.$SqlAdminPassword
12.7. Open Windows PowerShell in Administrator mode and run sc9_install_customDir.ps1

It will start installing Sitecore 9 Update 2, it will take time to complete.
Once completed, navigate to http://{$prefix}.local and http://{$prefix}.local/sitecore and login using admin/b

